X10DT installation instructions
X10DT is an IDE (Integrated Development Environment) for X10 based on Eclipse. In addition to supporting typical IDE operations such as browsing and editing X10 source code, X10DT also supports both local and remote building and execution of X10 programs. There are two recommended installation paths:
- Install X10DT as a standalone program. This is the simplest method and is ideal if your primary goal is to use X10DT to write/edit/run X10 programs.
- Install X10DT into an existing Eclipse installation via Eclipse update mechanisms. This requires more steps, but allows integration of X10DT with the rest of your Eclipse-based development tools. Installing a full X10DT into an existing Eclipse requires the existing install to be compatible with the version of Eclipse PTP (Parallel Tool Platforms) used by X10DT for remote building and execution of X10 programs.
X10DT Installation via All-In-One zip (simplest method)
X10DT is available as an all-in-one zip file that contains Eclipse, X10DT plugins and all of its prerequisites. Simply unzip and you're ready to run; just execute the program called 'x10dt' or 'x10dt.exe' for windows. You can get most recent all-in-one-zip from the X10 Release Page
To run X10DT and compile/execute X10 programs using Managed X10 (X10 compiled to Java) on the machine on which X10DT was installed, all you need is the all-in-one-zip and an installation of Java (Java 6 or Java 7). If you want to use Native X10 (X10 compiled to C++), you will need to have typical C++ command line tools available on your machine as well. On Windows, Native X10 requires cygwin and installation of the gcc-4 toolchain within cygwin. To compile and execute X10 programs on a remote machine, you will need to install an X10 distribution on the remote machine.
X10DT Installation via Eclipse Update Manager
Starting with X10DT 2.4.2, the full X10DT requires Eclipse Kepler 4.3.1 (due to dependency on PTP 7).
- Install Eclipse for your platform if you don't already have it installed (download from eclipse.org).
If you are using a Mac, please download the Cocoa x86 version; we plan to support x86_64 in a future release of X10DT. - Start Eclipse: For example, cd eclipse and execute ./eclipse
- In Eclipse: Help > Install New Software...
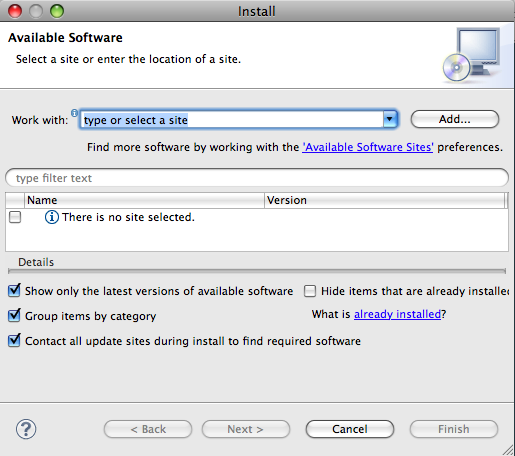
- Next to "Work with:", type the URL to the X10DT update site. Or, use the Add... button. The update site for X10DT 2.5.3 is http://x10.sourceforge.net/x10dt/2.5.3/updateSite/ (for other versions, simply change the version number portion of the URL)
- Click Next and accept the license agreement, etc. to continue with the download and install. The installation should automatically install the version of X10DT you selected with all of its prerequisite features.
- You will see a dialog "Security Warning" saying that the software is unsigned. Select OK.
- Restart Eclipse when prompted.
- X10DT should now be installed (or updated). If this is a new install, you will see a link to more information on the "Welcome" page that appears.
Click on "X10 Development" on the Welcome page to read help information on X10 and usage of the X10DT.
You should be able to change to the X10 perspective to create X10 projects and classes, compile, run, etc.
Window > Open Perspective > Other ... and select "X10"
For information on creating and running both X10 C++-backend and Java-backend X10 projects, see the help that comes with the X10DT (Help > Show Help Contents).